Monday 30 June 2014

Festive Cheer


Good morning all my fellow bloggers hope you are all well and if not big hugs to you.

Well it's Monday and Im hoping  the weather is going to pick up were off on holiday on Saturday.

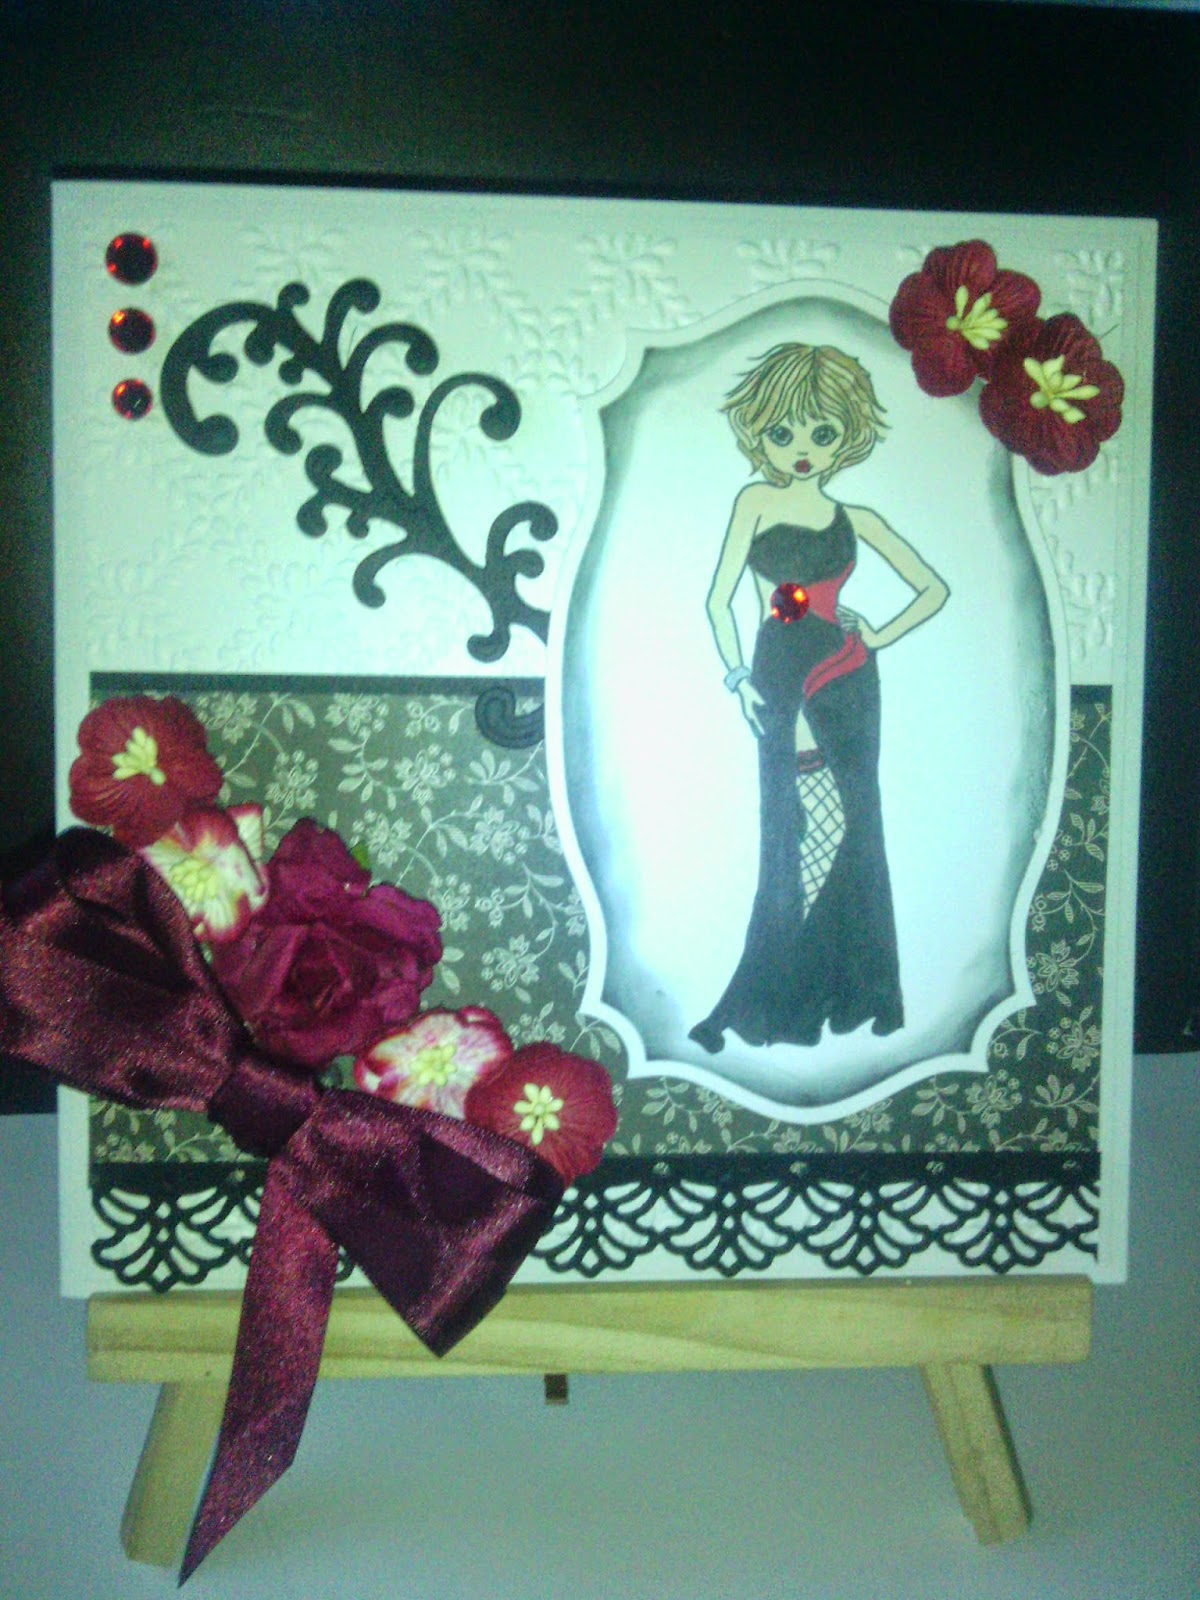
For today's card I started with a red scalloped card on which I cut three mats. And on the top One I embossed it then I wrapped some ribbon around the side of the mat before I glued it down.

With the floral Rectangle die I cut the largest one in red card. I then added it to the right hand side of my card.

I then added a topper from Hunkydory.
To finish off I added two poinsettas on to the bottom of the ribbon and a sentiment onto the top.

Thats all for today so its time for house work xx


Sunday 29 June 2014

Christmas in june


Good morning fellow bloggers its seems so wrong making Christmas cards and the Sun id shining in June. Lol .

Well today's card is a quick on. To start with I took a 8"-8" round scalloped card.
I then cut all the layer with the grand decorative circles.
I then layered them up.
I then cut my topper out with the smallest of the dies.

The image is a paper mania one. I added it into the centre of my card.

I then tried a messy bow out of seam binding. Next I cut my snow flakes out  with
The spellbinders create a flake die set. I then glued the
m to the side of my card.

Thats all for today it would be lovely if you could leave me your thought on this one. Xx


Saturday 28 June 2014

craft metal poinsettia


Good morning all well  wet here this morning. But its not raining at the minute. I think we enough 
Yesterday. What you all up to today I'm off to town to get Fae last minute bits
For the holiday and then I want to get my challenge card ready for Mondays
Whoopsidaisy.

For today's card I started with a 8"-8" white card on which I cut 3 layers.
For my top layer I embossed it and wrapped some ribbon around the side. I then layered it up on foam tape.

I then cut my decoupage out and I then added it to the top corner. I the cut some poinsettias out of craft metal and i then added them to the top of my paper decoupage.

To finish off i cut one more poinsettia and I added it to the bottom of my ribbon..
I than added a sentiment to the bottom.

That's all for today and Ill see you tomorrow. Xx


Friday 27 June 2014

fridays oldie 4


Over snappycrafts Erica is doing Oldies on a Friday. So this is my Oldie. This is the first card I ever made for my Husband he wad all ways saying what was I doing so I thought this card was fitting. That's all for today and I'll see you back here tomorrow. I think it maybe a Christmas card. Xx


Cheeky Pink Diva


Good morning all hope you all are well. And thank you for stopping by.

Todays card is by using a whoopsiedaisy digi stamp and you can get it from.linnie-whoopsiedaisy.blogspot.co.uk

I started by printing my image off I then cut it out the the centre die from  the Royal Verso Doily die set from Tonic.

I then cut all the layers from that die set out of pink satin board.

Then I made a 8"-8"white card and I then cut 3 white mats that I layered up.

I cut the marianne craftable edger die to the fold of my card so that when the card is stud up the edge will stand up.

I the added my topper to the centre of my card and then all the pink layers.

I then cut 4 corners from Tonic forever moments deco frame Emily.
I added them to each corner.

Thank you all for stopping by and thats all for today xx


Thursday 26 June 2014

Bling Diva


Good morning all on this Thursday morning. I was ask to make this card for a young girl who wanted a girlie girl card with lots of bling and I'm sure this as it.
When the lady that ordered pick it up she was thrilled with all the bling.

I started by printing my image off and it is fromlinnie-whoopsiedaisy.blogspot.com
And I cut it out with spellbinders Resplendent rectangles.. And I inked it
while still in the die.

Next I started with 8"-8" white card and I covered it with some pretty flowered paper. On my last mat I cut a aperture out the the largest die from the Respondent rectangles. I added it to my card with double sided foam tape.

The I added my topper into the aperture. I the went around the aperture with gens and down the lefthand side of my card and I also added two gem butterflies to the side of my card one at the top and one at the bottom.

I then tied a large bow and added this to tge side of my card. I then made two hatpins for my bow.

And then I added a large gem to the centre of the bow.

To finish with I added my sentiment to the bottom right corner.

That's all for today and thank you for stopping by xx


Wednesday 25 June 2014

a little more oh la la


Good morning on this Wednesday

This is card that I had to make in ten minutes as a friend came wanting a card like yesterday
theres always one Lol.

I started with a 8"-8" white card that I covered with lilac paper. I then wrapped a piece of lilac
lace around the centre.

I printed my image off the MCS cd and I then just did a little colouring in on it.

I cut it out with the spellbinder Timeless rectangles and I inked it while still in the die.

to finish with I added some paper flowers and a messy bow out of seam binding.

Not too bad for a very quick card.

That's all for today and I'll see you same place tomorrow.

Debs  xx

Summers Here


Good morning all hope you are all ok today. Now that I'm on the Whoopsiedaisy design team I have to do challengers. This is my first ever challenge I have done I just hope that it makes you think summers here.

I now have to work it out how to post it on the challenge blog. This should be fun.

I started with a 8"-8" white card and I then covered it with some yellow patterned paper.

Then I cut a strip of line green card cross the bottom of my card.

Then I cut a yellow one for djown the side but before sticking it down I wrapped a piece of lime green ribbon around it. with foam tape I Added it down the side. and then printed my image off and coloured it
in  with pro-markers.

Then I cut a mat for it to sit on in line green card. And then I cut another one in  yellow.
And the final one in lime green.

Then I added it on to my card to the right hand side.

I then tied a bow with yellow and lime green and added it to the bottom corner
And I made two hat pins to match.

To finish with I added two yellow roses down my ribbon. I used my hot glue gun so that they would stay on.

I'm just keeping my fingers cross that Ive done it right.

That's all for now.  Xx


Tuesday 24 June 2014

merry christmas


Good morning all hope you are all coping with this hot weather.
today's card is one that I made yesterday while sat in the garden.
I made a A5 red card and then I covered it with red and then cream which I
embossed the cream one but its not showing up on the photo.

I then added a piece of red card to the bottom of my card. I then wrapped
a piece of silver lace across the join.

The I cut two of each dies and I glued two together  I then cut mats for them to sit on.
I then opened the dies up and I glued them to the mats so they are 3D.

I then added them to my card at different heights. I then cut two pieces of bakers twine
and I glued one end to the top of my card and the other to the my die and
I tied a small bow at the top of each string.

To finish with I tied a large bow out of crush silk ribbon. I added a gem
on to the bow and two stick pins into the bow.

That's all for today, it would be nice if you could leave me your comments.

Debs xx

Monday 23 June 2014

A little art deco christmas


Good morning all and welcome to my new followers. don't know where this weekend as gone. Time just seems to be flying by.

I know its only June but here is a quick Christmas card made by using a Hunkydory topper from the art Deco collection.

I started with a 8"-8" white card and I cut a mat from snowflake card from Hunkydory. Then two white ones using the Decagons dies I cut a aperture in both the white ones. And I embossed the top one.

I glued my topper on the the snowflake mat in the centre. Then by using double sided foam tape I added my next two mat.with the topper showing in the centre.

I then tied a bow with merry Christmas on it.

To finish off with I Glued my flowers on with my hot glue gum.

I'm Moving slowly into Christmas cards I will start them properly after my holiday which is in two weeks.
That's all for today xxx


Sunday 22 June 2014

A little bit of oh la la


Good morning all well its sunday again and I just don't know where 
The days have gone. Well we've got the sun out again I hope we are going to have a lovely day like yesterday.

For to days card its a bit different for me  colour wise
I started with my white 8"-8" card I cut two white mats I added them to my card. I then cut another one on which I embossed it.
I added this to the front of my card.

I then cut a piece of black patterned paper to fit the bottom half of my card.
With black card i cut a border sorry  Ive forgot which it is.
I added this to the bottom of my card.

Next I printed of my image it is from linnie-whoopsiedaisy.blogspot.co.uk
I coloured it in with pro-markers. I then added a red gem to her hair.
I cut it out and inked it while still in the die.

I then added it to the right side of my card.
I the cut a flourish out in black card I then added it to the left side of my topper.

To finish with I added some deep red flowers and a bow the the bottom left corner.

That's all for today. And I hope you all have a lovely Sunday.   
Hugs

Saturday 21 June 2014

little Grace


Good Morning all hope you all have this lovely sunshine. What are you all up to today.

For todays card my image came from Daisy and friends cd.

And this is Grace and shes so cute.
I coloured her in with pro-markers.
In lemons and oranges.

I started with a 8"-8" white card on which i added a white mat and then a lemon and orange one. I then cut a white one which Embossed. I added this on to the top of my card.

I cut my image out with labels 29 and with double sided foam tape I added it to the side of my card.

I then wrapped a piece of lemon mesh around my card. I then tied a messy bow out of peach seam binding and I then glued it to the top corner.

To finish with I glued some orange and lemon flowers in the bottom corner.

That's all for today I would really like it if you could give me your thoughts on this one as I'm not sure if to bin it or not.

Many Thanks


Friday 20 June 2014

The Lady in the green dress


Good Morning all hope you are all well and welcone to me new followers.
Today's card is what it is reallly simple.

I started with a 8"-8" white ard and I cut 2white mats and a minty green one. I layered them up. I cut a white one for my front on which I embossed it.

I then wrapped my ribbon around it and tied a extra large bow.

For my topper I printed my image off  and coloured it in with pro-markers. My image came from linnie-whoopsiedaisy.blogspot.co.uk
I then cut my image out with the Decorative labels one from spellbiders.

I added my topper into the top corner
Of my card.

To finish with I added some gems
To two corners and I mafe a fancy stick pin for my bow.

Thats all for today and it would be great to hear your comments. X


Thursday 19 June 2014

Lady in red


Good morning all hope you all are well after a day of sunshine yesterday.
I hope we have another sunny day today   I to get some colouring in while sat in the sun.

Today's card is from linnie-whoopsiedaisy.blogspot.co.uk sheet 514 I love this image as you can dress it or down.

I started with a 8"-8" white scalloped card.

I cut two mats in white I added them to my card. I the printed my image off and
Coloured it with pro-markers. I then added it to my card.

For my top layer i cut it at 7'-7" I the cut a
aperture in the centre and I then embossed it with a art deco embossing folder.

With double sided foam tape I added it on to my card so that the aperture fits around my image.

I the tied a messy bow and I added it to the top corner of my card

To finish with I added some pretty flowers just below the bottom of my aperture.

I would just like to thank you for stopping by. That's all for today so I hope you all have a lovely day. Xx


Wednesday 18 June 2014

sweet rosie


Good morning all I hope this post turns out all right as I'm writing it on  my new mobile and at the moment  I feel like putting it back in the box,

Anyway back to today,s card  I have made it by using the  Daisy and Friends CD,
I would like to hear your thoughts one this one as im not sure about it.

And this little girl is Rosie. I printed her off and coloured her with pro-markers.

I started with a 8-8 square card I the cut a mat of  paper from the cd and added it at a angle

I cut my topper out with a square die. I added it to the centre of my card.

I added some glowers to the corner of my card and a couple of flowers to the top corner.

To finish with I tied a pink bow and added it to the top corner and I then added two stick pins to my bow.

That's all for today and thank you for stopping by xx

Debs xx


Monday 16 June 2014

Cheeky Diva


Good morning all and welcome to my new followers.
I am now the new member of www.cutedaisymay.blogspot.co.uk and this card is one of my sample. Linnie does all the art work for ruby red crafts.
and she did the art work for Joanna sheen's Daisy and friends cd.

I started by printing my Digi stamp off and I coloured it with pro-markers and I added a little glitter to her dress and hair.

To make my base card I used the grand labels die set I used the largest one. And then I cut all the layer in white card and with the smallest die I cut my image out.

I then tied a large bow which I added to the bottom corner and then I added some paper flowers just above the bow.

This image is from sheet 514

I would just like to say thank you for taking time out to stop by. I now don't feel on my own in blog land.
That's all for today and I hope to see tomorrow. Take care xx


Sunday 15 June 2014

In loving memory of you mum


Good morning all and welcome to my new followers.
Today's card is a quick one that I made to take to the crematorium with some flowers for my mum.

It is made with the grand Decorative circles die set.
I used all my scraps of satin board. And a large pink bow.
Thank you for taking the time out to stop by. Take care xx