Monday 31 March 2014

Yellow Rose


Good morning friend, bloggers well its soon got around to monday again.

For todays card thought  I would use spring colours as spring is upon us.

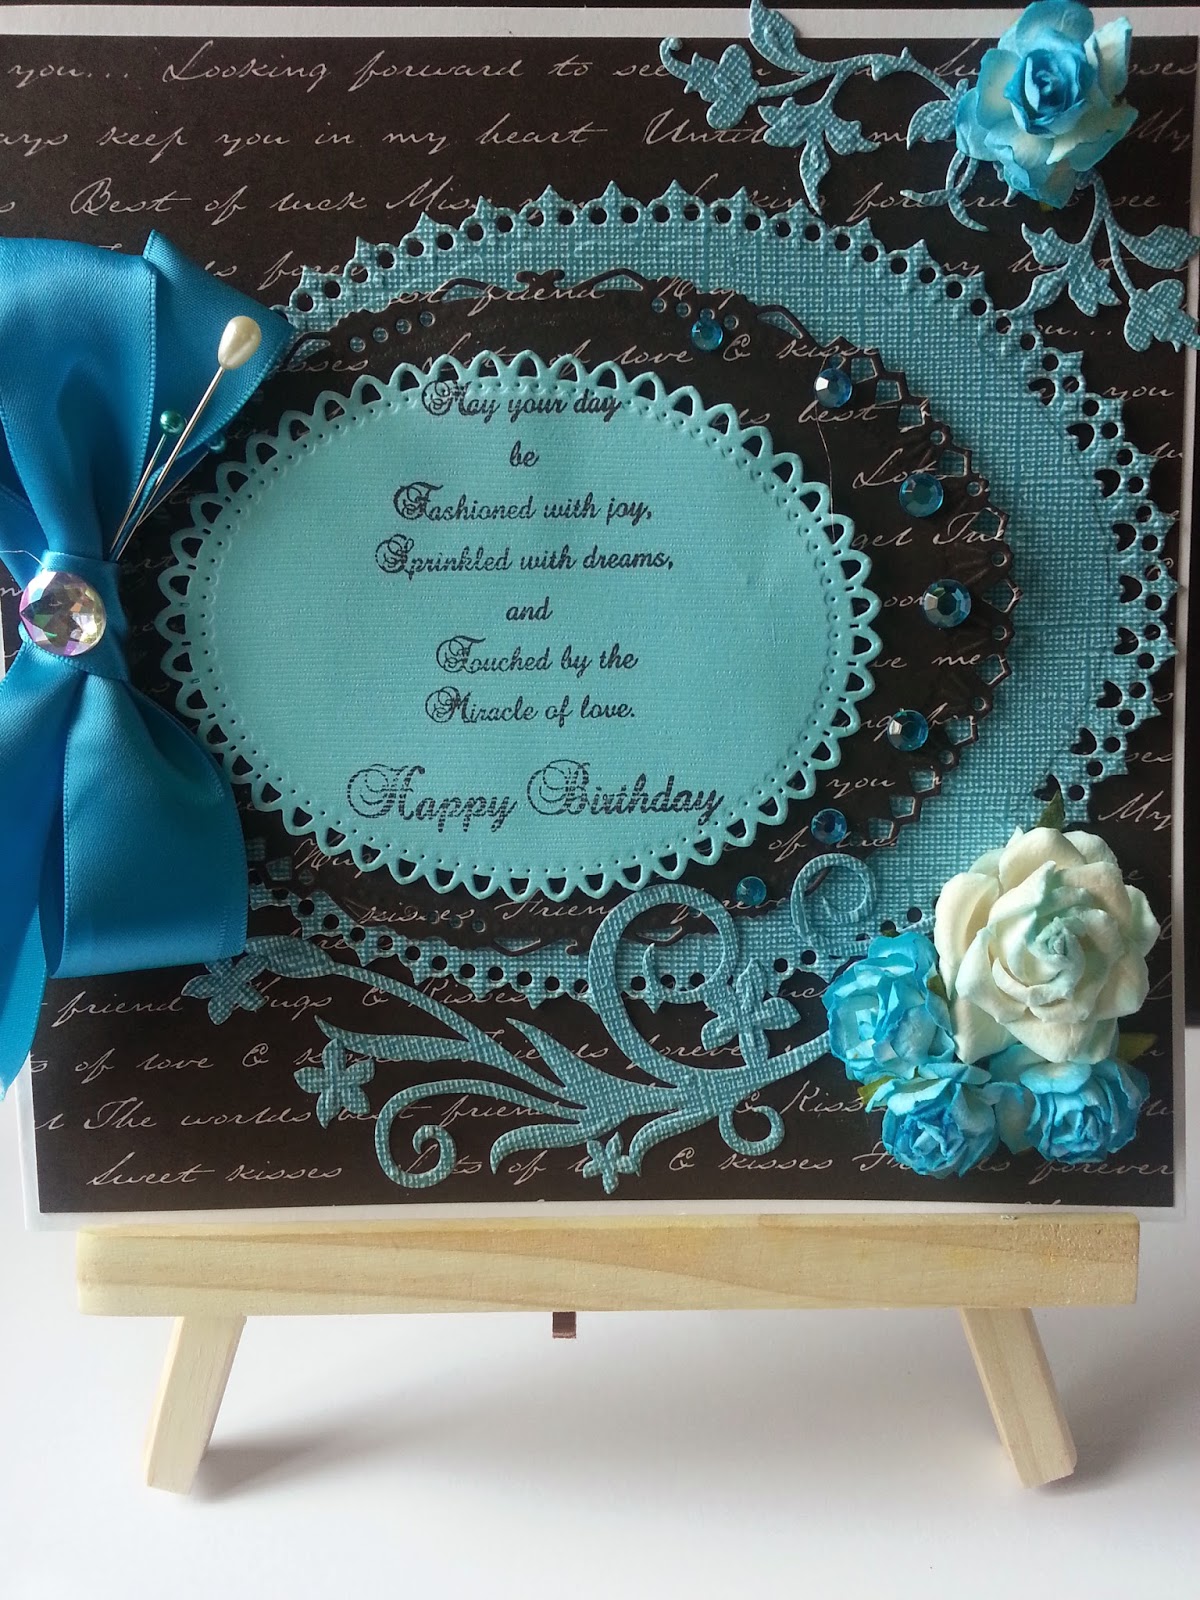
I started with a A5 landscape card. I cut a mat  out of Lemon card and then one in white of which I embossed.

I cut a Opulant oval out of lemon card. Then I cut two corners to be glued behind my oval at the top and bottom.

I glued it into the middle of my card. Then i wrapped a piece of yellow ribbon around the bottom.

I then tied a bow an glued it on to my ribbon to the righthand side of my card.

I cut a Happy Birthday with a die out of yellow card and then I glued it in the centre of my oval.

To finish with I added some paper flowers and a butterfy.

I made 2 hatpins and I added some gems. Thats all for today Debs xx

Thank you for taking time out to visit. Debs xx


Sunday 30 March 2014

Lilly the pink


Good morning all on this Sunday morning how any of you forgot to alter your clocks Lol. Its soon got around to sunday. Im sure time is just flying by just lately I must be getting old.

for todays card I used spellbinders grand decorative labels one and decorative labels one. And Tonic Lilly die set.
I started with a 8-8 ins white card I then cut my largest mat with the largest die from the grand labels die set. And then I cut the next two dies down and my last mat i cut the largest die from the normal labels one. I mstted them all up and i then added my sentiment into the centre.
I then cut my lilly out with the tonic die I glued them together to make my lilly. I used my glue gun to glue my lilly to the bottom corner. To finish with I cut some corners from the tonic dies. And I added a few butterflies here and there. I hope you like this one. It would be nice yo hear your comments. Debs xx

Thank you for looking Debs xx

Saturday 29 March 2014

debs cards: Blue Asta's

debs cards: Blue Asta's: Good morning to you all This Saturday. Todays card I love it. Its turned out alot better than I thought it would. To start with I took ...

Blue Asta's


Good morning to you all This Saturday. Todays card I love it. Its turned out alot better than I thought it would.

To start with I took a 7 3/4 square card I cut s mat at 7 1/2 - 7 1/2 ins and then s blue one at 7  1/4 - 7 1/4 ins and a white one at 7ins square in white. I stamped on to this one with a background stamp and embossed it with white embossing powder. I then cut a aperture in the centre of this mat with the statley circles die i then cut a large circle again but this time in blue off set the two and put them back into my aperture. I stamped my sentiment and cut it out with the smaller statley circle die and I cut another one in blue and off set it again. I glued it to the top of my other die cut. I thrn tied two messy bows in two shade of blue seam binding. I used my glue gun to glue them on top of each other. I cut my large flower with the spellbinders asta flower die set and I glued it on top of my bows. I them cut three flowers using the spellbinders jeweled flower die set and Then I glued them to the top of my card.
I then cut some flourishes and leafs and added yhem to my card. I hope you like it as much as I do. See you back here tomorrow. Debs xx

Thank uou for taking the time to look. Debs xx

Friday 28 March 2014

debs cards: With Deepest Sympathy

debs cards: With Deepest Sympathy: Good morning friends today is the last Of my sympathy cards we will be back to  happier times. I started with a white A5. I cut a mat out...

With Deepest Sympathy

Good morning friends today is the last Of my sympathy cards we will be back to  happier times.
I started with a white A5. I cut a mat out of white and i cut another one which I printed my sentiment on yhe top half and I embossed the bottom half with the garden lattice  embossing folder. I wrapped a piece of blue ribbon around ghe middle. I cut the tattered chantilly lace bow  out of blue silk card twice. I extended the bow by cutting up the second one so that the bottom pieces are showing from the back of the front one if you know what i mean. See youall tomorrow with a happier card. Debs xx

Thank you for looking xx

Thursday 27 March 2014

Wiyh Deepest Sympathy

Good morning my blogging friends today card is the second out of three sympathy cards.
To start with I made a 7-7in white card I then cut a white mat that I embossed with the X Cut art deco embossing folder. Next I cut my mats for my sentiment to sit on with the statley circles dies. I added my sentiment on yo yhe top of my mats and yhen I glued it to the centre of my card. I tied a large pink bow and glued it just below the topper. To finish with I added a few diamanties to the corners of the card. thats all for today I will see you all back her tomorrow. Debs xx

Thank you gor looking Debs xx

Wednesday 26 March 2014

debs cards: Heartfelt Sympathy

debs cards: Heartfelt Sympathy: Morning all hope you are all well. Yesterday I went to the hairdresses and came home with acard order as long as my arm. Today is th...

Heartfelt Sympathy


Morning all hope you are all well. Yesterday I went to the hairdresses and came home with acard order as long as my arm. Today is the first one of three sympathy cards.
I started with a A5 white card blank. I matted a white piece of card on to it. I made one more mat on which I printed my sentiment on to the top half. I embossed the botton half an.then I wrapped a piece of pink ribbon around the middle. To finish with I cut a tattered chantilly lace bow die in pink and added it to the centre of my ribbon. I know it is for a sad time but I think it is not too fussy but still pretty. I would be nice to here your coments on this one. Check back in tomorrow. Debs xx

Thank you for taking the time out to look xx

Tuesday 25 March 2014

mothers day


Morning all my bloggy friends. Just a quick post today as ive got a busy day ahead with hospital appointments. A naighbour asked me to make these cards last last night so it was a bit of a rush. Check back in later. Debs xx

Thank you for taking the time out to look at my blog. Xx

Sunday 23 March 2014

debs cards: Cut Fold And Tuck

debs cards: Cut Fold And Tuck: Good morning all on this sunday morning I hope its going to warm up as Im freezing. Todays card is a little different for me. Im sor...

Cut Fold And Tuck


Good morning all on this sunday morning I hope its going to warm up as Im freezing. Todays card is a little different for me. Im sorry about the photo I have tried every thing to tr. and get the ribbon to show the proper colour. For the background I embossed a piece of white card i edged it with distressed ink.
cut  The smallest of the spellbinders Grand Decorative Circles One dies out of white card and inked it through tge die. I next cut the next size up out of teal card. I cut the Cut Fold and Tuck Puzzel die out of double sided teal card. Folded and tucked it and popped it on my circles.
I stamped my sentiment and cut it out using the smallest of the Marvelous Squares die. I then inked around the edges.
I tied a bow out a teal satin ribbon which I added to the top corner.
I made a flower out of pleated satin ribbon. I just rolled it up till it was the size i liked and I used my hot glue gum to glue it in place I added a pearl to tge centre to finish it off.
All for now Debs xx

Thank you for taking the time out to look. Debsxx

Saturday 22 March 2014

A Lilac Birthday


Good morning all on this satuarday. For todays card I have used the Chantilly Diamond die by Tatted Lace.
Spellbinders Twisted Metal tags.

To start with i took a 8-8inc blush coloured card then I covered it with some pretty paper from a Hunkydory paper pad. I cut the chantilly corner die 4 times I glued then to the centre of my card making a Diamond. I cut the chantilly buntin die I cut it once and then I cut it up in to three pieces. I placed one on to the top and bottom join ti cover the join up. I the cut a strip of card about a inch deep and placed it across tge center of my card. I then stampped my sentiment on to blush card and cut it out wiyh the Twisted Metal Tags. I placed it on to my card in the centre. I tied a messy bow out of lilac seam binding and I placed it to the side of the card. To finish with I added tree paper flowers to the righthand side of my card and I finished with some diamanties and two hatpins. Xx See you all tomorrow Debs xx


Thank you for taking the time to look xx

Friday 21 March 2014

vintage wedding


Morning all todays card is one of those you thinks not going to work and then it turns out better then you thought it would in the first place.

I started with a 8-8in card and i covered it with a lovely vintage paper from my stash. I then cut out my vintage topper using the spellbinders Timeless Rectangles middles size. I inked it around the edges with  Antique Linen disstress inks. Then I cut the largest die out of blush card and I also inked this mat. I wrapped a piece of cream cotton lace around the side of my card. I added my topper to the side of my lace. To finish with I tied a messy bow out of cream seam binding and I also added two hatpins that I made my self. I do hope you like this one as muck as I do. It would be nice to hear your comments. Thats all for today Debs xx

Thank You For Looking xx

Monday 17 March 2014

A touch of silver


Morning fellow bloggers well its soon got around to monday again. This is the last 25th Anniversay card I made. This card is about a 8-10inch. I started with a white card blank I cut a white mat and then a silver one. I next cut a mat out of white card and embossed it with the lattice garden embossing folder.and then i cut a piece of card at a angle in silver and embossed it with the same folder. I cut a assortment of flowers in silver and white with spellbinder dies. I added them to the join of the two colours. I added my sentiment to the top centre of my card. I then tied a large double bow and glued it to my card just below the flowers. Thats all for now Debs xx

Thank you for taking the time to look xx

Sunday 16 March 2014

lets fly away


Morning all on this sunday morning. Todays card i made for my sisters 25th wedding anniversary. It is a really easy card to make. I started with a A5 white card I then matted it four times with white card. I the added my sentiment to the last one. I cut a assortment of Butterflies from Tonic Studio and I just placed them randomley around the card. I must admit I think its stunning. I do hope you like it. So thats all for now. Debs xx

Thank you for looking xx

Saturday 15 March 2014

feeling a bit blue


Morning all hope you are all well this saturday morning. When I made this card i was'nt sure about the colour but the more I look at it I really like it. To start with I  cut a 8-8inch white card blank I then cut a piece of black and white card a touch smaller than the card. I the cut the 3 smallest dies in the grand decorative ovals in differant shades of blue. I off set them on to my card. I tied a large double bow and added it to the left handside of the card. I cut some leafs and added them with some paper roses to the bottom of my card. I do hope you like it. Check back here tomorrow Debs xx

Thank you for looking xx

Friday 14 March 2014

Friends


Morning all hope you are all well todays card makes you feel like the spring is here. I love this colour scheme. I started with a white base card i started by cutting the fancy lattice die out of lemon card. I extended the pattern by two inch so I would have room for all my flowers. I left a edge to the background so I  had room for my fiam pads. I stamped my sentiment and cut it out with one of the resplendent rectangle dies. I inked it with a yellow ink pad so it matched the flowers. I cut the largest shape in the resplendent rectangle to mat my sentiment on. I added paper roses all down the right side of my card. I tied a large messy bow out of seam binding and tucked it just under my flowers. This card finished size is 8-8 inch squire. All for now Debs xx

Thank you for looking Debs xx

Wednesday 12 March 2014

25th wedding


Morning all todays card is ll about Opulent ovals and scalloped borders. I started with a 8-8 card blsnk in silver and i cut a piece of card from my stash that is embossed.Next I used the scalloped border die to cut two matching borders for each side of my card. I cut the cream one using the decorative inserts and one of the cutting edges. Then I cut a slightly larger one in black border using yhe same edge. I tape them together so the black one shows through the decorative insert are mounted both borders facing each other on the edges of the card using mounting foam pads. For my focal element, I used the largest size of the opulent ovals die set to cut out  my back layer in black.  my cream layer I used the next size down. I then cut the tatted lace couple die out of silver card. I then add it to my focal topper. I wrapped a piece of lace around the bottom of my card. I added my sentiment on to the centre of my lace.. i do hope you like it I would be really happy if you could leave me your comment on this one. Till tomorrow Debs xx

Thank you for looking xx

Monday 10 March 2014

Oh La La

Morning all well its soon gone back around to monday. This is one of my favourite cards. As i love the colours.  I pick out some beautiful coloured papers in green white and black. I covered my background with one of the papers. I cut a strip of paper and matted it on the black and green card. I cut two of the spellbinders Vintage Lace borders in black card. I glued them together to make one deep border. I added a a piece of ribbon to cover the join. I added a large white bow out for  shear  ribbon to the side of the card.I adde two black pins to the bow. For my focal point I simply cut two of the Vintage Lace Motifs, one in white and one in black. I offset them with with white on top so you could see black die cut peeking out. Next I cut two of the smaller dies in the same way and mounted them on top of the others. I stamped my sentiment and added that to the top. Before I added the topper I put some feathers at the back of my topper. I then added to yhe center of my card. I do hope you like this one as much as I do. It would be nice to hear you r comments Debs xx

Thank you for looking Debs xx


Sunday 9 March 2014

A Little bird told me


Mornin all for this sunday mornings card Ive made i a pretty framed card. I used a small strip of pale blue paper at the bottom. I yhen embosssed a piece of white card. I then cut a border bt using the spellbinders border dies.
I added a pale blue ribbon across the join. And then I tied a messy bow from blue seam binding. For my focal element I used the Decorative labels one die set. And I cut two frames using the two largest dies and then another two frames using the next size down in the set. I glued the two largest frames together offsetting them and I did the same with the two smallest ones. I stampped my sentiment on yo white card. I added some foam pads to the back of both frame sets and then I offset them over my sentiment and trimmed the excess card away from my  sentiment. I reall like how these dies make a lovely frame. I hope you all have a great sunday see you back here tomorrow. Debs xx

Thank you for looking xx

Thursday 6 March 2014

Many Happy Returns


Morning Bloggers Hope you are all well this fine Thursday morning.
Today's card I started by cutting the Elegant Labels Four dies using the inside die to create a frame out of white card. I then cut a larger piece of teal card to use as a mat for it. I glued the white piece to my card and then lined up the centre die to cut the opening exactly in line with the frame. Next I stamped my sentiment and cut it out with the Gold Labels Four smallest die. I cut a larger one as a mat for it. I cut the Twisted Metal Tag die and glued it over the top and attached the tips to my frame. I added some flat back pearls as accents. To complete the card, I used the technique called Paved Pearls around the edge. This Technique uses cosmic shimmer white PVA glue to make random seized drops all along a 1/2" wide border. I love to do these drops. I do hope you like it. It would be nice to hear your comments on this card. Debs xx

Thank you for looking Debs xx

Wednesday 5 March 2014

Its Your Birthday


Morning all I just love this card to start with  I cut a 8" x 8" card base I then cut a mat in mint card at 7 3/4 in square and the a mat of white card at 7 1/2 in square in whit card. I then did some dots with cosmic shimmer pva glue all around the edge. I then cut a mat at 7" Square in mint card. I also cut a mat at 6 3/4 in square in white card on which I embossed it. I stamped my sentiment in black Adirondack ink i cut it out with the Elegant Labels Four die and used the smaller die in the middle to cut a frame. I didn't  emboss it just yet though, but I did remove all the fall away pieces from the die, then but left it still in the die template. I glued the die cut to a piece of mint card White it was still in the die, then I embossed the two pieces. The mint card becomes raised into the spaces where the fall away pieces had been removed. I do hope that makes sense. I hand cut around the edge of the mint card, Leaving the pretty white die cut edge to show on top. I mounted it on foam in the centre of my embossed  frame. I stamped my sentiment and cut it out with one of the petite labels, inking it very lightly with mint ink while still place. I mounted this in the middle of my Elegant Labels Four frame. I tied a large bow with crushed silk ribbon and added two hat pins and a pearl to the centre of the bow. I do hope you like it. Debs xx

Thank you for looking Debs xx

Tuesday 4 March 2014

Monday 3 March 2014

Happy Birthday in lilac


Good morning all its soon got around to monday again.  I love lilac and white together so thats what we have today.
I started by cutting two of the decorative labels 8 dies in the largest size in white card. I snipped away a small strip from the sides of both of them to make them fit as a background. I then glued them on my lilac card. Next I stamped my Cupid backgroung and heat embossed them with white embossing powder. Using the matching Antique Tags One die set, I cut  an aperture in the bottom of my background. I stamped my sentiment on to white card and mounted the background over it using foam pads. Next I cut one of the medium sized dies in the decorative labels 8 set in white card i mounted it over the heart in the background. I stamped my sentiment and frame on lilac card. I cut it out with the matching tag die. I cut the smallest die in the decorative labels 8 set. I cut it in half and glued it to the top and bottom of my sentiment. I placed it into the centre of my focal piece. I cut a piece of white card just a lttle larger then my background and the I punched a border down both sides. To finish with I glued it to my white card And added a bow in lilac seam binding down the side of my card. Finished size is 61/2 x 8" in size. Thats all for today. Debs xx

Thank you for looking xx

Sunday 2 March 2014

teal and cream


Good sunday morning all. Todays card is one of those cards when you need a quick one.  I started by cutting two of the largest die in the Resplendent Rectangle die set out of blush card. Next i cut a piece of blush card to fit inside the two rectangles when they are side by side. I used the fancy edge from them as a decorative edge on my card. Next i cut two large cornersin blush card and two in teal. Next I cut backings in opposite colours. Then I started in one corner alternate them as you put them in place, overlapping each one as you go. This leaves you with a diamond shape in the centre of your card. I placed one of the Marvellous squires dies in the eara. The I simply embossed the shape into it. Remember my card is flat so it was easily done. While the die is in place went over it with Antique Linen distress ink. I stamped my sentiment in to the centre of the embossing. It was a real simple card to do. Finished size is 6"x8" in size. See you back here tomorrow Debs xx

Thank you for looking xx

Saturday 1 March 2014

Just for you


Morning all this is a card thats gots more than one die set on it. I started by cutting two of the Asian border glued them lefthand side of my card. I ran a piece of white seam binding down the centre and added a messy bow to the bottom. Now for my focal element. I started with a large labels 28 in white and Venetian motif in peach. I cut the motif in half and glued it to the top and bottom of the labels 28, clipping the curly edges over. Next I cut a a Asian motif in peach card. Next I stamped my sentiment and cut it out with labels 27 turned to an X shape. I then glued it on top. I added gems to the top corners. All for now. Debs Xxx

Thank you for looking xx