Friday, 28 February 2014

more botanical swirls


Morning all its friday againg this week as gone by so fast. I love this die as it is extendable.  I think it looks great in the simple cream and black. I used Antique linen disstress ink to highlight the embossing. I cut it out and the I expanded it which I found that it was easy to match up. I stamped my sentiment on to cream card and matted it on to black card and cut a folk at one end.I mounted it on the diagonal across my card. I then tied a large black bow and added it on the bottom left corner of the card. I do hope you like it it is such a great die to work with. Debs xx

Thank you for looking xx

Thursday, 27 February 2014

Botanical swirls


Morning all hope you are all well. I like this card as it is done by just one die. I started by cutting my die with some blue card I decided to put it with black card so the swirls would show through. I matted it with black and light blue card. To finish with i tied a messy blow out of blue seam binding and a jem in the center. Thats what you call i quick card.  Off now to take my son for a hospital appointment so that will be a days trip. Debs xx

Thank you for looking xx
Wednesday, 26 February 2014

All of a flutter


Morning my blogger friend for this card I started with cutting my apertures in my background using the outer die from the Exquisite Circles. The upper  aperture I cut the bbasic lattice piece to sit in the the opening and in the lower aperture area, I used the next size down in the Exquiste circles to to emboss yhe details in The black card. I added my sentiment into this apeture I added some doublesided sticky sheet to some white card, I cut my butterflies cut and i peeled off the cover of the sticky side and I used silver gildinng flakes. I then added them to my card. To finishh off with I tied a messy bow with black ribbon. It would be nice if you could leave mr your comments. Debs xx

Thank you for looking xx


Tuesday, 25 February 2014

Pretty in blue


Morning all todays card is a real girlie card. The base of this card was by using the heartfelt creations die. It is a lovely lacy  die that as so many possibilities. I have used it here by threading my seam binding through.
for the flowers i have mixed paper flowers and spiral flower three die. They look great when mixed.The spiral flower is rather a large flower compared to the others. I like how they look together. I added my sentiment and the flowers down the side I did paper piercing around my card. I hope you like this girly card Debs xx

Thank you for looking xx

Monday, 24 February 2014

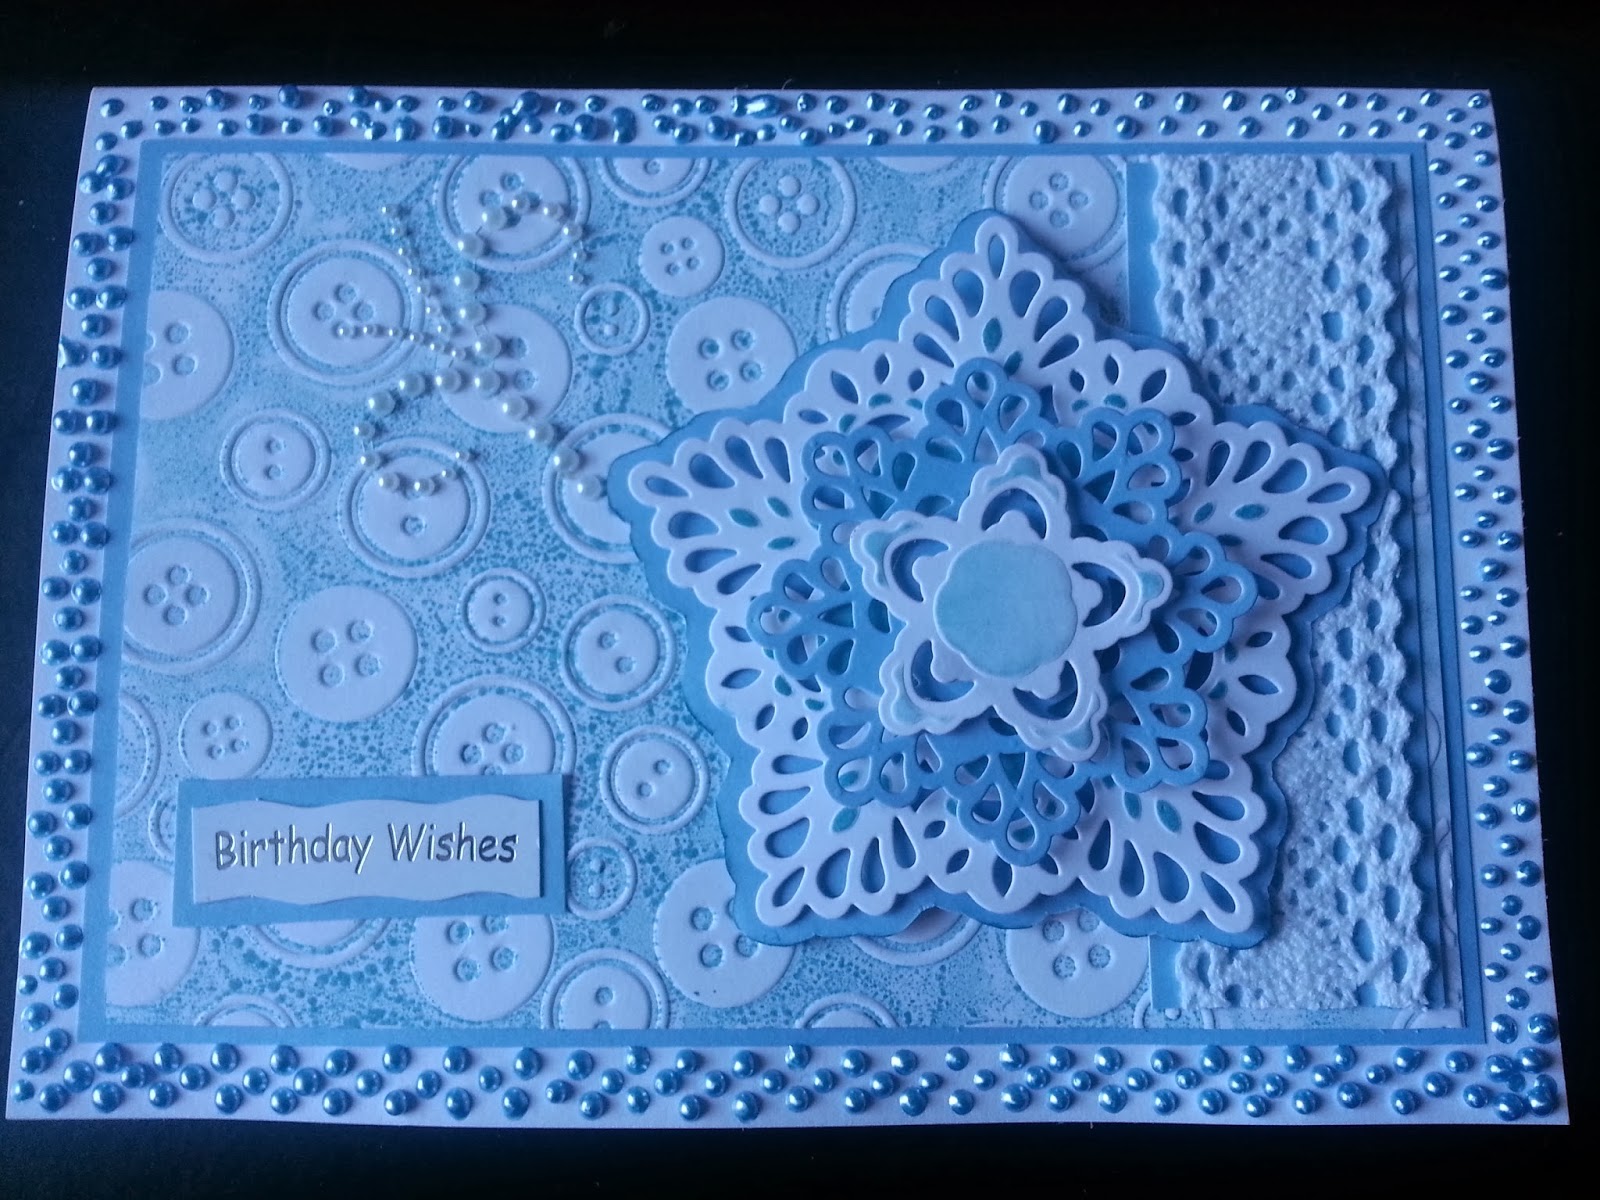
Blue Buttons


Morning all hope youve all had a good weekend. So this morniing weve got a bit of blue and white.

Shopping list for this card is:
Blue and white card.
Embossing folder ive used one with buttons in.
Blue liquid pearls.
And the Spellbinders moroccan die set.

To start with marked my card about one cm all round my card to make a border to make a frame around my card with liquit pearls. I left it all day for it to dry. While it was drying I got on with rest of my card. I inked my buttons embossing folder with a blue ink. So that the ink was transferred on to my white card. Giving a hint of blue on my buttons.  I used a piece of blue card to make a faux mat by tracing around the largest die. I cut the largest die in white card and then i cut the next die down in blue card which I matted on to my white die cut. I cut the smallest die on white card and inked it while still in the die. Before adding my topper to the card I wrapped some white lace around one side. I then added my topper to my card so that it over hangs my lace. I added my sentiment to the bottom of my card. While I were making this card i was'nt sure about this one but I must say its turned out rather good. It would be nice yo hear what you think of it. Debs xx

Thank you for looking

Sunday, 23 February 2014

Black and White


For todays card you will need:
Spellbinders floral Ovals:
Black and white card.

This is a very simple card to do I started with a piece of black card which I wrapped some white lace around the bottom. I cut the largest floral ovals out white card and I mounted it on foam tape. I stamped my sentiment on white card and cut it out with the second largest oval die. I attached it with foam tape on top of my larger die cut to finish my focal element. I added a small flurish of pearls. To finish with I tied a large double bow in black organza. To complete my bow I added 2 hat pins. The finished card is  61/2 x 81/2 . I hope you like this one. Till tomorrow Debs xx

Thank you for looking xx

Saturday, 22 February 2014

In the pink


Morning all hope you are all well. Well the weekend is here.
Shopping list for todays card is:
Black and White card and a touch of pink,
Spellbinders floral oval dies ,
Maroccan accent and border dies.

Against my background of black and pink tiny roses. I added three floral Oval dies that I cut out the centres by cutting on the piercing dots.
This is easy to do a perforation to cut along. I placed two of them overlapping each other vertically and glued them to my background.  The third one I glued across the horizontally, creating rings around my sentiment. I stamped my sentiment in black and cut it out with the smaller floral ovals. I inked it  with black soot distressed ink. I then backed it with the moroccan accent piece cut in bright pink. On both sides of my center piece, I then cut 2 borders in white card with the moroccan border die. After added the borders I cut two strips of bright pink card. I tied a double bow in bright pink and I then I added two pink hatpins to my bow. I then glued my bow just under my  focal element. I hope you like todays card it would be nice to hear your comments on this one. Debs xx

Thank you for looking xx

Friday, 21 February 2014

A touch of lemon


Morning all the weekend is nearly here. And for todays card ive used the spellbinder The marvellous squares and the basic lattice background. And the Grand Decorative Ovals. For this card i started with some lemon card as my main background i cut the basic lattice. Next i cut one of the grand decorative ovals in white. I used the smaller one i put inside and embossed it. In the center of this piece i stamped my sentiment. Next i used a squar sticky adhesive sheet to cover my white card.I cut out one of the marvellous squares creating a frame. I peeled back the backing and covered it with micro beads. I mounted the frame over my sentiment with foam tape. I then cut 4 corner with the tatted lace chantily flourish. I added a over sized bowin white ribbon. When i were half way through this card i were not sure about it but its not so bad after all. It would be nice to here what you think of it. Take care Debs xx


Thank you all for looking xx

Wednesday, 19 February 2014

In Lilac


Morning all hope you are all well this cold wednesday. Im a little upset about this photo as the background looks a different shade of lilac but in real its the same colour.

For today card you need
spellbinders Vintage lace dies.
spellbinders labels23 and labels 28.
white and lilac card.

To start with I got some lilac paper from my stash I cut 4 borders with the vintage lace die I love this die set i added four borders around it to create a pretty frame. I overlapped them at the corners and added large pearls. The smaller pearl. Bare liquid pearls. From there i cut a labels 23 die out of white card I inked it while still in the die.  I stamped my sentiment in black ink. I cut it out with labels 28. I inked this one while in the die too. I mounted it with foam tape and added it to the center of my card. I tied a messy  bow in lilac seam binding
and then added it to the top corner. All for now Debs xx

Thank you for looking it would be nice if you could leave me your comments xx

Tuesday, 18 February 2014

Best wishes

Morning all hope you are all well. Im sorry about this photo but ive tried my best to get it better but with no success.
this card was real easy i had a 8"-8" white card
I matted and layed twice and the i cut the floralrectangle from spellbinder and inkrd it with spun sugar while still in the die I added yhis to the left hand side of my card. I then vut the floral ovals large die and inkrd it again while in the die. I put this on the top of my rectangle. I cut the next size down in the floral ovals and again inked it up. I then stampped my sentiment in the center. I then cut a border with the veneion dies I put this down the Right of my card. I tied a double bow in white ribbon and added 2 hat pins. I hope you like it. Its just a shane about the picture. Debs

Thank you for looking xx

In the pink

Morning all this tuesday todays card is a real girlie card but so easy to do.I matted and layedmy pink and brown card. I cut the splendid circles from spellbinders in pink card and I then cut a mat in brown by using the Tonic Studios layering dies. I then ccut it in halfI just moved then apart. I put my sentiment on these semi circles I put happy on the left one and birthday on the other. I then cut a strip of brown card and matted it with pink I put it across my card to cover the center of my card. I cut three of the layered flowers by spellbinders and I added them to the band thats going across my card. To finish this off I tied a double bow and two hat pins. It would be nice to here your comments. Debs xx

Thank you for looking xx

Monday, 17 February 2014

A Touch of gold


Morning all hope you are all well on this monday morning. Todays shopping list is;
white card
paper flower
gold silk card
gold mica flakes.
Spellbinders A2 Filigree Delights die.

I started with embossing my background
Next I used the Filigree delights die and cut it out with white card i used the iner cirlce i covered it with mica flakes a i monted it on my card and then i mounted the filigree frame over the top of my flakes its just a shame the photo doesnt pick it up right.. I then mounted it to the left side of my card. I added my sentiment on a piece of white card and cut it into a strip and cut the ends of into a fork. I mounted it across my card and embellished the edge with a sugared rose and tulle. I pieced the edges to finish my card. Debs xx

Thank you for looking hope you can leave me your comments. Debs xx

Sunday, 16 February 2014

Happy Birthday


Afternoon all hope you are all well this Sunday.
Todays shopping list is
white card
purple card
stamps to die for;  posy lace
spellbinders lables 30.
Spellbinders scalloped borders die set

To start with i got my purple card  and used the scalloped border Dies to make a pretty edge.
I used two of the inserts three times. And then
Finished the bottom with one th scalloped cutting edges. I really like the way these dies look together.
I matted a piece of white card behind to show through, as it really shows these dies off. Next i stamped my die  called posy lace. It as been made to go with labels 30 and it gives you a pretty edge.
I colouered it in with pro-markers. I used the Opulant Ovals To cut a thin frame to sit behind my focal piece. I put my peeloff on some white card and cut it out with the smaller dies 30 and I put foam tape on to the back then I mounted it on to my stamped posy lace. I tied a large bow with white sheer ribbon and added it to the side of my card. To finish with i added two hat pins to my bow. I do hope you like it as Ive really enjoyed Making it. Debs xx


Thank you for looking it would be nice if you could leave me a comment Debs

Saturday, 15 February 2014

Lets fly


Afternoon all sorry to be late with todays post.
Shopping list for this card;
Papermania Embossing folder
satin pink card
Tonic butterfly dies
white card.

I started by embossing my card and then I cut a aperture out  in the center. I then mounted this on to pink card.
I then mounted them on to my white card. I cut and embossed my butterfly die in white card. I arranged
and glued them over my aperture to finish with I added flowers and a bow and a sentiment.
It would be nice to if you could leave a comment. Debs xxx

Thank you for looking xx  

Friday, 14 February 2014

happy valantine


Morning all happy valantine
Todays card is a really simple card all i did was
punch along the top and bottom with The Tonic butterly punch and the i used the hearts die from tonic i cut and embossed the larger of the hearts to the lefthand side of my card and then the smaller to the right.
i cut a flower with the spellbinders blossom 2 die and added it to the center of my heart. I hope you like this card as much as i do.
Happy crafting Debs xxx

Thursday, 13 February 2014

On your bike

Morning all here again dosent time fly.
Shopping list for todays card are.
1 fancy shaped white card
1 Topper
Anja Squire die set from marianne dies
white card mint green card
Spellbinders Grand Decorative Labels One

To started with the pink card and cutting it with the second largest die from the grand labels one.
and added it to my card base. I then cut the white card with the nexted down die. the I cut the mint card with the Anja Squire dies and added it to my card. I then added my topper on to the center of my die cut.
Made the bow by gathering my ribbon up.
It was as really quick card to make. Hope you enjoyed it. Debs xx

Wednesday, 12 February 2014

A TOUCH OF TEAL


Morning all hope you are all well on this Wednesday morning.
For today's card I have used some lovely teal card that I had in my stash I punched two borders in teal and white with the Tonic Regal punch.I put them together with the teal one on the top. I then cut a mat in white from the Tonic verso regal doily die set.
Then I cut the two largest dies from the set in teal and then the forth one in teal too.I the matted them all together. I stamped my sentiment on to a white 4cm circle.
I added the borders to the bottom of my card and i added the doily to the right hand side of my card just over hanging the side.
I cut the butterflies out with the Tonic dies to the left hand side. I finished with a teal bow. Debs xx

Tuesday, 11 February 2014

Someone Special

 Morning all today card is one of my favorite  ones I started with a 8"-8" white card and I folded the front back on its self. I the used the Tonic regal punch to punch down the front of my card. I tied a red ribbon down the front. I then cut the regal verso regal doily die set form Tonic in white and then I cut the tonic heart dies in red and white. I added this to the front of my card with a small red bow.
And I cut red corners and added them to two of my corners.
Hope you like its as much as I do. I see you back here tomorrow.  Debs xx

Thank you for looking

Monday, 10 February 2014

Get well soon


Shopping List
Spellbinders Filigree Delights
Lillibet stamp set
Red card
Cream card
Cream Card Base

Afternoon all today's card is made with the Filigree delights die set.  I started with a cream card 24 - 19cm. I cut a mat at 16cm by 21cm in red
and then  a mat in cream 15 1/2 -20 1/2 cm. and a mat in red at 12 - 15 cm.

I matted the mats all on top of each other with the smallest  red mat at the top of my card. at the bottom of my card I cut a filigree delights die out in cream card and placed it on top of my red mat.
I the cut the A 2 scalloped border die across the bottom of my card. I stamped my sentiment with the filigree tag die and added it to the centre of my die cut. To finish with a tied a large red and cream bow. Hope you like it as much as I do. Debs xxx

Thank you for looking

Sunday, 9 February 2014

Purple and gold butterfies


Morning all on this sunday
To days card is a real easy card as it is a per-scored card and die cut.
All I did was add the topper that came from Hunkydory on to 2 mats that I cut just a little larger then the topper.
 I cut 2 strips of purple card also from Hunkydory and added them onto the sides of my card.
I then cut two strips of gold mirri card about 1in across and glued them onto the purple card.
I then cut 2 borders from the Persian die set from spellbinders.
To finish with I added a bow in purple and white ribbon and a butterfly to the top corner. Debs xx

Thank you for looking x

Saturday, 8 February 2014

In the pink


Morning all hope you are all well on the Saturday morning.
I started with a 8-8 ins white card I then cut a pink mat just a wee smaller than the card.
next I cut another mat and embossed it. I went around the edge with a pink distressed ink.
I matted it to my pink mate. And before you add this mat to the card wrap some pink ribbon around them. I cut 2 borders from spellbinders Venetian motifs and accents and added them to the top of my ribbon then I cut some ribbon to cover the join in my border. I now added my mat to the card.
Then I cut the largest 2 dies from the Labels 6 die set. while still in the die I went around the edges with spun sugar distress ink and then i matted them on top of each other. I added them to my card just above my ribbon on the left hand side. I cut my center piece from the venetian motifs on to the tops them. I stamped my sentiment and cut it out with a small circle die.
I cut my butterfly with spellbinders pa pillion2 die.. I cut  one in white and one in pink I glued them with the white one on the top of the pink one. To finish with I tied a large bow and glued it on to my ribbon on the right side. Hope you like this one It would be nice to hear your comments. Debs xx

Thank you for looking x

Friday, 7 February 2014

Blue rose


Morning all on this friday I must say that this card is one of my favorites because I love this die it makes some stunning card.
Thing I used to make this card are;
Spellbinders Heartfelt Elegant swirls
Blue ribbon
and blue flower and white card.

To start with I made a 261/2cm by 18cm white card.
I cut a mat to go on the top of the card measuring 17 1/2 by 25 1/2 cm and I paper pierced around my mat
i cut a white card measuring 23 by 15cm on which I placed my die to the top and cut it out. I then embossed the bottom. Then matted them all up. I stamped my sentiment just below my cut out.
I then  added some blue roses in different shades across the embossing line. and added swirls to make then like leafs. and I tied a messy bow. Debs xxx

Thank you for looking

Thursday, 6 February 2014

Someone special


Things I used to make this card is;

8-8 card blank
Tonic Heart die set
Tonic Regal border punch
red ribbon
and red flowers
and a sentiment

Hi all how are you all doing on this Thursday morning. I started with my card and I punched it all the way a cross the top and the bottom with the regal punch. then I cut out all the dies from the die set in white then i cut mats for them in red I then layered them on top of each other. I added my heart on to the front of my card just off center and at a angel I added my sentiment to the bottom right. To finish with I added flowers and a bow. Debs xx

Thank you for looking

Wednesday, 5 February 2014

Have a great day


Things I used to make this care are;
Spellbinders A2 Scolloped borders one die set
Marianne creatable CR1242 Passe-portout Rectangles
Paper roses
and white ribbon

Morning all hope you are all well on this Wednesday
To make this card I cut a 8"-8" white card and I cut a mat for it at 73/4-73/4
and I them cut and embossed a mat at 6 1/4-6 1/4 I then cut a piece of pink flowered paper the same size of my next mat which is 6" squire on this mat I cut a aperture at the top right corner with the marianne die. I them cut the scolloped border one. and that was added to the left hand side. To finish with I added flowers and a sentiment and a white bow. It would be nice if you could leave me your comments on the card. Debs xx

Tank you for looking 

Tuesday, 4 February 2014

Lets Celebrate

Good morning bloggers on this Tuesday I hope you are all well.
Today's card I'm really pleased with the way this one came out.

Things I used to make this card;
Creative expressions Lapis Sapphire lustre embossing powder
Curved Borders one by spellbinders
Resplendent Rectangles from spellbinders
Stamp is from stamps to die for Flower Frame for resplendent rectangles die set

Today's card was inspired by the one and only Sue wilson.
I started with a 9 1/2" - 71/2" white card I then cut another piece of white card 71/4-91/4 and then I pierced all the way around the edges. I then cut a mat of 7"-9" mat I stamped it with the flower frame and embossed it. I cut and embossed a mat 81/4-6" and then I cut a aperture using the resplendent rectangles middle size. I then cut some satin card with the curved border die I then mounted it to the bottom of my card. to finish with I added some paper flowers and a small bow.
Hope you like this one it would be great to hear your comments. Debs xx

Thank you for looking

Monday, 3 February 2014

A little blue

Morning All today's card is a really easy card to make. To start with I made a A5 tent fold card I cut a piece of pretty paper just a little smaller than the base card and then I wrapped my ribbon around my paper to the left hand side. I then cut 2 spellbinders corners from the gold elements one die set. I added them to the corners of my card on top of the ribbon. Then I tried a double bow out of crushed silk ribbon then I added it to the left hand side I also added 2 hatpins and a pearl to the bow. I hope you enjoy this card. Debs  xx

Thank you for looking

My little mermaid


Morning all hope you are all well this mornings card is abit unusual for me as i dont do bright colours.
I started of with a scolloped card and I cut three mats by using  spellbinders grand circles I cut the center out with a scolloped circle die I mounted my topper which is a Besties topper through the center
I also cut a mermaid out and added it to the front of the card and I also added foam flowers to the other side. I finished off with a large bow. Debs xx 

Sunday, 2 February 2014

Cream Happy birthday


Happy Sunday Morning hope you are all well. Todays card is one of those when you need a quick card
I started with a A5 card blank in cream and cut a Labels 11 smallest die and stamped my sentiment to the center. and then I cut a 5-7 Labels 28 Enchanted die and that is the largest one. all I did was layer them on top of each other and add a bow but I think It looks really classy Hope you all have a great day. Debs xx

Saturday, 1 February 2014

with love


Morning all hope you are well and have a great Saturday
To days card I made with a A5 base card I layered a piece of white card which I embossed  a touch smaller than  A5. I the cut the Resplendent Rectangles die from spellbinders and the I cut a piece of pretty paper from my stash to fit just inside the die. then I cut the second size die in the Timeless rectangles set also from spellbinders. I cut my sentiment out with the small resplendent rectangle dies.
to finish off with I just added some pretty paper flowers and a small bow.
Its just a petty that the photo doesn't show it off too well. check back in tomorrow. Debs xxx