Friday, 29 September 2017

Happy Birthday Sweeta Dixie


Hi all how we all doing this Friday morning.

Today’s card is a bit different for me as I’ve been playing 
With inks to make my background I was really pleased 
With the way it turned out.
So I started with a 7”- 10” white card 
Which I mat and layered it with the background I’d
Just made,

I cut my frame out of white card and the sweet Dixie die.
I added this to the centre of the card.
I then cut out my sentiment and I added it to the centre of the frame 

I then stamped my flowers on the the green card with gold ink.
A I cut them out with the matching dies,
I added these to the side of my topper.

I then cut some white foliage with Sue Wilson dies
And I tuck them under the flowers.
To finish with I added some pearls to the corners.


Hugs Debs xxx

Thursday, 28 September 2017

Happy ever after


Morning all hope you are all well this morning 

For today’s card I have made a wedding card for a friend.
I started with a 8”- 8” white card.
I mat and layered it with different shades of creams and beiges.

I then cut out the heart die from Tonic out of white.
And the next die down in beige card.
I added this to the left hand side of my card.
I then cut out my sentiment out on the Scanncut and I
Then added it to the  On centre of the heart.
Next I cut the mr & mrs and I added it to the right top corner.

I then stamped my flowers on to vellum with gold ink.
And then I cut them out with the matching dies.
I then added the flowers to the bottom corner of my card.

To finish with I tied a large bow out of cream ribbon 
And I added it to the bottom corner of my card.
I then added a gem to the centre of my bow to finish the card off.


Hugs Debs xxxx


Wednesday, 27 September 2017

Butterfly


Morning all hope you are all well this morning 
I must apologise for  the colour of these pictures 
I tried everything to get a good picture but just wouldn’t play.

For today’s card I have used some of my Tonic dies.
I started  with a 7”-10” white card.
I then added a strip of teal card across the bottom 
I then  cut a border out of white card and I added it to the 
Teal strip.
Next with the circles dies I cut them out in teal and white card
I mounted them on top of each other using foam pads.
I added this to the right of my card.

Next I cut out the butterfly trail out of teal card
And I added it to the side of my topper.
I then cut out the butterfly out of white card and I then added 
Then on to the teal butterflies.

To finish off with I tied a messy bow out of teal ribbon 
And I added it to the top corner.

That’s all for today 

Hugs Debs xxx

Tuesday, 26 September 2017

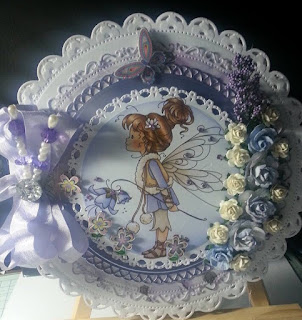
Fairly wingsa


Morning all hope you are all well and have a good day today
I’m hoping to have a bettter one today as it was my Dads birthday
Yesterday so kit was a sad day with Him not being.
So I tried to focus on my crafting all day and this is one of the
Cards I made.

Started by making my base card from spellbinder decorative circle dies.
And I cut each die out of shades of lilac.
I added them to my card with foam pads.
I then cut out my image with the smallest die in the set.
But. While it was in The die inked around the edges.
I then added it to my card.

Next I added some flowers down the right hand side.
I then tied a messy bow out of lilac ribbon and I added with to 
The left hand side of the topper.
To finish with I added two beaded pupils to the .bow.


That’s all for today and I thank you for stopping by 

Hugs Debs xxxx


Monday, 25 September 2017

A little whoopsidaisya


Good morning all hope you are all well and had a good weekend.

For today I have returned to my dies for a change.
I started with a 8”-8” white card that I used a
Punch along to top bottom and side.
I the use a die to make my flowers with which I added to the 
Corners.
Next I wrapped a piece of lace around the spine side 
Of the front.
I then printed off my image from a whoopsidaisy cd.
And I ten cut it out with my frame die.
I added it to the centre of my card.

To finish with I tied a purple bow which I added to the side
Of my card.
I then threaded a piece of ribbon through a bow embellishment.
To finish with I added two beaded pins to the bow.

That’s all for today and I thank you for stopping by 

Hugs Debs xxx

Sunday, 24 September 2017

Rose gold collection two


Good morning all how are you all doing this morning 
And are you having a good weekend.

Today’s card is another one made with the Rose gold collection 
From  Hunkydory.

I started with a 8”-8” white card 
I them cut a mat from the card from the kit I added
It to my card I them cut a strip of card which I died down
The left hand side next I added a frame to the side of my card front.

I then added my topper on to the frame which I used
Foam pads 
And to finish off with I tied a bow out of peach ribbon
I then added it to the top right corner.

That’s all for today and I thank you for stopping by.
And I hope you have a lovely day.

Hugs Debs xxx

Saturday, 23 September 2017

Peach florals


Good morning all hope you are all well this morning 
What are we all up to this weekend.
I’m going to try and do some sample.

Today’s card is made it’s a hunydory set called rose gold 
Which I really love.

First of all I cut a mat it f the backingcard from the kit.
I then added a strip of gold card down the right hand side.
I then added my topper to the centre  of the card using
Foam pads.

I then added a sentiment  topper to the top corner.
And then to finish off with I made three peach flowers
From foamarin I just love this stuff after you heat the foam
It feels  realistic.

Try and make a few flowers each day and put them in a box
So I have them ready for my next project.

That’s all for today and thank you for stopping by 

Hugs Debs xx


Friday, 22 September 2017

Baby Girl cardw


Good morning all how are you all doing today I hope you’re having a good day.

Got today’s card I have used dies as well as my Scanncut.
I started off will a 8”-8” white card.
I then cut a mat out of pink glitter card on the Scanncut.
I added this to my card.

Next I used a Tonic die which is called Victorian tapering dies.
I cut the two largest dies out of white glitter card.us
I added this to my card by using silicone gel.

Next I cut the next two dies down out of white glitter card.
I the added this to my card.
I then cut out the rock-a-by baby out of white card on the .
Scanncut from the tattered lace Scene building usb.
I then inked this with spun sugar distress Ink.
I added this to the centre of my card.

Next I cut out my butterfly sentiment out of white glitter card 
From the tattered lace sentiment usb.
Which I added to the top of my card.

I then tied a large bow out of pick sheer ribbon 
I added it to the bottom corner of my card.
I then added some pearls to the bow and to finish off
With I added a gem to the centre of my bow.

That’s all for today and I thank you for stopping.

Hugs Debs xxx

Thursday, 21 September 2017

Happly Birthdaya


Good morning all I hope you are all well this morning 
What are you all up to today anything nice.
I’m off to have my nails done and then to the hospital for my bloods
Doing again.

For today’s card I thought I would get out my dies for a change
So for this card I’ve used Sue Wilson dies which I’ve had years so 
I thought I would give them a airing.

I started with a 7”-10” white card I then added a checked mat
And then with a white mat I cut out the largest die in the set
Which left it in the card. I then added it to my card.

Next I cut out the next die down in the set using checked card
And I added this to the top of the white die cut with foam pads.

Next I cut out my happy birthday and added it below 
My topper 
I then tied a large bow which I added to the bottom of my card.
And I then cut out some foliage for the top of my bow,
And to finish with I added a gem to the centre of my bow.

That’s all for today and I thank you for stopping by and leaving
Your comments I do really appreciate them.

Hugs Debs xxx


Tuesday, 19 September 2017

Grandfather clock part 2


Good morning all how are you all doing 
I hope you are all well.

Today I'm posting the finished photos of my grandfather clock 
I cut out all the pieces of the case out of
Gold Mirri card and white card.
I put I together using red liner tape as I find it is the only
Thing that holds it strong.

I then cut out the pendulum out of gold Mirri card
And white card for the end of the pendulum. I added it to my case.

Next I cut the base out which is the same base as the 
Clock.
Next I glued the clock on to the case and then on to
The base.
I have left the back of the clock open so that I can add
A battery clock mechanism to it when it arrives.
I'm then going to decorate it for Christmas.

That's all for now and I hope to see you tomorrow 

Hugs Debs xx

Monday, 18 September 2017

Grandfather clock part 1


Good morning all how are you all doing this morning 
And have you had a lovely weekend 

Today's project is part one of my grandfather clock which
I'm making using the craftorium fireworks USB.

I will have part two tomorrow as I've still got the case and base to make.

I started by cutting out the clock out of gold Mirri card
And I up it all together with red liner tape.
I then cut out all the lace mats out of whit card
Which I added to the base ofte clock.

When it's finished it will be about 3-4 ft tall

That's all for today and I hope yo all have a lovely day.

Hugs Debs xx

Sunday, 17 September 2017

Family Tree frame


Good morning all hope you are all well this morning 

For today project I've done something different from acard
I've used a 12"-12" box frame

Which I used gold gilding was around the frame.
I cut my tree out on the Scanncut out of brown card.
I added this to a 12"-12 cream card.

Next I drew the names of my family on to pink and blue
Card with the Scanncut.

Then I got the Scanncut to cut them out in a heart shape.
I added them to the tree with glue gel.
I then added a couple of butterflies on to the tree.
I them put it back into the frame.

And to finish it off I added some butterflies to the corners
And one to the glass.

That's all for today and I hope you all are having a good weekend.

Hugs Debs xxx

Friday, 15 September 2017

Christmas Treew


Good morning all I hope you all well this morning and 
Ready for the weekend. What a you got planned for it.
I'm going to try and have a go at making
A family tree box frame o the Scanncut.

Today's card is made with a 8"-8" white card base
Which I cut a mat out of silver glitter card. And then a white mat.
I then cut a frame out of silver glitter card on the Scanncut.
I added this to the card front using foam pads.

I the cut my sentiment tree out of green card and then another one 
Out of white which I covered with double sided sticky sheet.
I then added the white one on top of the green one
So that there is a shadow.
I then added it to the centre of the frame and then I
Peeled of the sticky sheet and covered it in glitter.

I then made three flowers out of Silver which I added to the 
Bottom corner.
To finish with I tied a red and green bow that I added to the 
Top corner.

That's all for today and thank you for stopping by.

Hugs Debs xxx

Thursday, 14 September 2017

Christmas Joy


Good morning all I hope you are all well this morning 
I'm pleased to say I'm back into my crafting again.
So today we have another Christmas card that I made
By using a Tina Fitch cutting file for the Scanncut.

I firstly cut out my base card out of white card 
Then I cut out the word joy out f whit card and the next layer 
Out of red card and the top layer out of white card.

I used foam pads to layer it up.
Next I cut out the snowflake out of white card which I 
Covered with micro beads.
I added it to the centre of my card and to finish off with 
I added a gem of the centre of the snowflake.

That's all for today and thank you for stopping by 

Hugs Debs xxxx